Wherever Life Plants you-Bloom mini folio
Hi Friends!
I'm Dana and I'm here to share my last project for the month of February. Today we'll make our own handmade mini folio, using the Tres Jolie February Scrapbook kit! This kit has so many pretty design papers and I love the addition of A-4 Diecut sheets! This is one kit you don't want to miss out on.

I'll be using some items from my stash, including Tim Holtz Distress Ink Gathered Twigs, kraft cardstock, pearls, crystals, Stickles Stardust and Diamond glitter, Luna paste Moonlight Pearl and Moonlight Rose, Sizzix Thinlets envelope die, velco closures, and some photos.
To begin this project we'll be cutting several pieces of heavy kraft cardstock to create our mini folio.
Cut 1 piece of kraft cardstock to measure 10 x 8 & 1/2 inches. From the 10 inch side, score your paper at 1", 2", 8" and 9". Fold on lines. This will be your back piece.

Next take 2 pieces of kraft cardstock, cut one piece at 8 & 1/2 x 6 inches and the other piece at 8 &1/2 x 5 3/4 inches. Glue and attach your pieces one on each side on your bottom piece.

Take another piece of kraft cardstock and cut to measure 6x11 inches. Score at 8 & 1/2 and 9 5/8. Fold over top and glue onto the backside panel on your bottom base piece.

Take another piece of kraft cardstock and cut to measure 3 & 3/4 x 5 & 1/4 inches. And glue onto each side flap.

I chose several coordinating papers to decorate my mini folio book. I inked all my papers before adhering to my pages.
I cut from same paper, my front cover panel and top flip up panel to measure 5 & 5/8 inches x 8 & 1/4.
Left and right side front panels measure 5 & 5/8 x 8 & 1/4.
Small flip pages on each side flap, I adhered 2 element Small journal cards on each side. Inside front panel papers measure 4 &7/8x 8 inches.
Open folio and on the left and right inside panels, I cut my paper to measure 10 &1/4 x 8 inches. Score at 4 & 3/4, fold and adhere your paper onto each side.
Now we can decorate each page, using a variety of embellishments. I took the larger dragonfly chipboard embellishment, and painted the body with some acrylic black paint. For the bottom chipboard wings, I applied some Luna paste Moonlight Rose and on the top chipboard wings, I applied some Luna paste Moonlight Pearl. Let dry. Then glue your pieces together one on top of another.
Inside center bottom panel I diecut a mini envelope using a Sizzix Thinlets die. Fold and glue your flaps together. I adhered some velcro closure to my envelope flap so it can open and close. I punched out one of the flowers from the diecut sheet in our kit, and tucked inside my envelope. Glue your envelope towards the bottom of the page. You have room above to add a photo if you like. Here's a closeup!

I left the top flip page bare. I didn't want to add too much bulk, so my folio can close properly. You could add a photo above if you like.
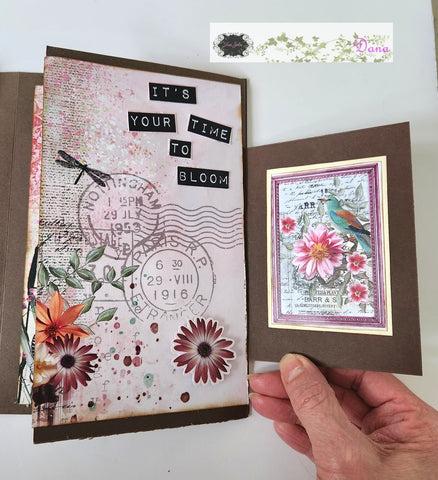
Top front flip page, I added a photo and cut one of the sentiments from the elements sheet. Then glued my sentiment above my photo. Here's a closeup!

The top flip page above I also left blank and room for adding a photo.

Open up the left side of your folio. I made a pocket from one of the scrap papers from this kit. I cut to measure 5 & 1/4 x 4 inches. I glued a diecut flower onto the front pocket and tucked another diecut flower into my pocket. I cut one of the border sentiments in half, and glued at the top of my page. On the left side of the page, I added a photo and fussycut another sentiment piece from the elements sheet and glued at the top of my page. Here's a closeup!

Small flip on the left side, I cut out two of the smaller Journaling cards from the elements sheet, then adhered on the front and inside flap.

Inside flap and adjoining page: I cut out another sentiment piece and adhered at the top of my page. Using foam dots I adhered a bubble bee onto my page.

Right side small flap: I glued 2 smaller Journaling cards on the right flap and inside flap. On the adjoining page I fussy cut sentiment pieces and glued at the top of my page. I punched out another diecut flower and adhered with foam dots at the bottom. More closeups!

Inside inner flap: I added another photo, a sentiment from the elements sheet and butterfly from the Prima flower package, at the upper left corner.

Fold and close up your folio. Using some leftover Scraps, I cut 3 strips of paper: one measuring 5 & 3/4 x 1 inch. Glue along the top outside panel of your folio. Cut 2 strips measuring 8 & 1/4 x 1 inch. Glue on each of your side panels.

Front cover:
I punched out acouple flowers, leaves and cute girl image from the A-4 Diecut sheets. I inked my diecut shapes. I bent the leaves slightly to create movement. I added some of the beautiful Prima flowers included in this kit and arranged onto the right side of my front cover. Using foam dots (stash) I adhered the cute girl diecut on the left side. I applied some Stickles Stardust glitter on the bottom of her dress. Using foam dots I adhered another sentiment square onto my cover, along with my dragonfly chipboard embellishment. I tucked some mini pearls, and moss in between my flowers. Then scattered some bubble gems and crystal gems to finish. All from my craft stash. Here's some closeups!


I hope you enjoyed my project today and will grab a kit for yourself and start creating a folio of your own. Be sure to check back and see what beautiful projects that Kim, Jeanne and Crystal have to share!
Until next month, Happy Crafting!
Dana
