Vintage Printer Tray
Hello Crafters! Dana here! All this week we are having a collaboration with Clear Scraps! Everyday this week the Designers from Clear Scraps and Tres Jolie will share their beautiful creations and hopefully inspire you to try something different.
For my project today, I'll be creating a Vintage Tray to display in your home or surprise someone special with a unique gift. I'm using an older kit from Tres Jolie. The papers are Blue Fern Studios "Jane's Memoirs .They were just the perfect choice for this project. I love the Vintage look to them. The Printer Tray is from Clear Scraps
Click here https://www.clearscraps.com/product_p/csptsmallrectangle.htm

along with the Dress Form Chipboard Embellishment Click here: https://www.clearscraps.com/product_p/cscedressform.htm

To begin my project I cut off the border strips from each 12x12 paper. Youll need 6 longer strips and 5 shorter strips.

I glued my strips along all the border edges on each section of my tray. I recommend using a strong permanent bond glue such as Beacon glue. (From my stash)Trim off any excess paper. And smooth any rough edges using a Distress tool (from my stash) then with a sponge brush (my stash)apply a very light coat of Mod Podge (my stash)over the border strips. Let dry.

Now cut away one of the chipboard dress forms. You can save the other one for another future project. I like to save the outside chipboard frame as well. These are great for framing photos. I took some Gliding Wax Renaissance Gold, (from my stash) and rubbed some over the top knob ( you can skip this step since the knob won't show) and bottom stand of my chipboard dress form with my finger. You don't need much. Let dry.

Next I fussycut out the vintage women wearing the dress, from the "Bouquet" paper. I inked along the edges using Tim Holtz Distress Ink Gathered Twigs. (From my stash) I trimmed the sides of her dress slightly so it would fit inside the longer window section of my tray. (Lower right) then glued her onto my dress form. Isn't she lovely? Here's a photo:

I applied some Stickles Diamond glitter (from my stash) to parts of her dress. I adhered a diamond gem on the hair towards the upper part of her hair. Set her aside for now.
I measured and cut a variety of patterned papers from this collection, and arranged where I wanted them placed before gluing down. I then glued each paper to the back chipboard piece of my tray, making sure each one is positioned properly to fit behind each window section on my tray. Now glue each chipboard frame piece in place. One on top of another. I chose not to add the acrylic sheet to my tray. But you can add it if you like. Here's how it looks so far:
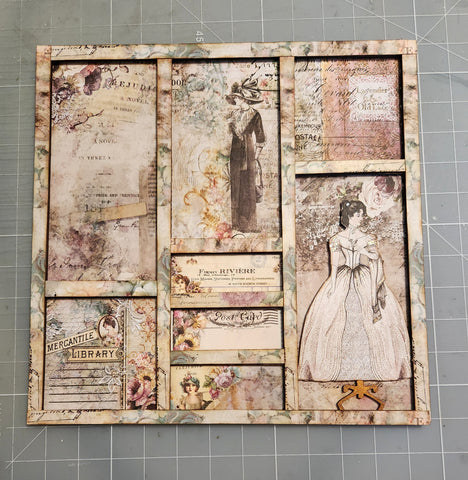
I chose some of the Bits and Bob's ephemera pieces to decorate the inside of each tray section. I also found a heart charm I had saved from an old necklace, a tiny mirror (from my crafty stash) along with a Tim Holtz idea-ology Vintage button. I'll describe briefly how I decorated each section of my tray. Keep in mind, you can decorate these trays with any items or trinkets you have in your stash.
The top left section I glued some Prima flowers, heart charm, and tiny mirror (from my stash) I fussy cut out the Oval Vintage lady and sentiment piece. Then adhered using foam dots. Here's a photo!

Upper Middle window: I adhered a wood piece from my stash on the left side and using foam dots I adhered the vintage boot! Here's a look:

Upper right section: I cut out a small journal card and glued inside this section. Below this section I torn some paper and glued below. I found a metal embellishment in my stash to finish. Here's a closeup photo:

The lower 3 sections, I glued a fussycut image and a tiny wooden envelope from my stash. The last section of my tray on the lower left, I glued a vintage button from my stash. Here's a photo:

That completes my project! You can add a metal hanger onto the back of your tray or add ribbon, or jute cord.
Thanks for visiting the Tres Jolie blog! Look for more projects from all our designers.
Happy Crafting! I'll be back next week with another project for you!
Dana