Vintage Christmas File folders Box
Hello Crafters!
Dana here! Hope you are finding time to Craft during this busy time of year! I have a fun project to share that I hope you'll like. I'm using the December Scrapbook kit from Tres Jolie! This kit is jam-packed with papers from Simple Stories "Christmas Lodge" collection and pretty flowers from Little Birdie and 49 & Market. Delicate chipboards from Tres Jolie shop! You will be able to create many projects or Scrapbook pages from just this kit.

Isn't it amazing? Be sure to grab a kit or even two.
For this project I'm using Tim Holtz idea-ology Vignettes Divided Drawer, Idea-ology Woodlands Christmas tree( Large )and paper dolls, along with some photos. In addition, I'll be using extra ephemera, washi tapes, enamel dots, and Brads from this Simple Stories collection. I will be listing measurements as we go along and inking my papers using Tim Holtz Distress Ink Gathered Twigs.
To begin, unwrap your Vignettes drawer. Remove the wood section from the left side and set aside. We'll be using this piece later.
Taking one of the 12x12 patterned papers from the kit, cut two long pieces at 9 & 3/4 x 1 & 1/2 inches, and adhere to the long sides of your box. And from the same paper, cut 2 smaller pieces at 3 & 1&1/2 inches, and adhere at the top and bottom of your box.


Taking another coordinating paper from the kit, I covered the inside bottom, and long and short sides. Long sides measure 6 & 1/2 x 1 & 1/2 inches. Short sides measure 3 x 1 & 1/2 inches. Bottom inside paper measures 6 & 5/8 x 3 inches. Wood piece measures 3 & 1/4 x 1 & 1/2 inches. Along the top edges on the left side of my box, I applied matching striped washi tape over top (from my stash) and from this paper collection.
On the right section of the box, I cut a piece of scrap chipboard from my stash, at 3 & 1/4 x 3 inches. I covered the top of my chipboard piece with the Winter Wonderland paper from the kit. Then glued the chipboard piece over the top section of my box. Here's how your box should look now.

On the front, take the wood section we saved earlier and cover with matching paper from the kit. I cut down one of the small ephemera tags and adhered over the top using foam dots(from my stash) Then added one of the sentiment stickers from the sticker sheet and adhered over the top of my tag! I added one of the matching Brads on the right. Along the top of my wood piece I glued 2 Tim Holtz idea-ology confection candy canes (from my stash) over the top edge. Here's a closeup!

Taking my Tim Holtz Woodlands Christmas tree Large, (in my stash) I sprayed it with some Prima Bloom Spray in Fir Needles (in my stash) and set aside to dry.

After your tree has dried, i applied some white acrylic paint ( in my stash) to my tree branches using a stiff brush. One your tree is throughly dry, I glued the bottom part of my tree in my Tim Holtz idea-ology Tree stand. (In my stash) I applied some Finnibair Snowpaste(in my stash) on the bottom of my tree stand. Then I glued a few tiny presents (from my stash) under my tree! On my tree branches, I glued some Tim Holtz Idea-ology Droplets to resemble ornaments. I glued some Tim Holtz Idea-ology Fountations feet ( in my stash)on each corner of my box.i recommended using a strong bond glue like Beacon glue to make sure your metal feet won't fall off. Here's a closeup!

Now we can start working on our File cards and pockets. You may use pre-made file cards and pockets or make some of your own, using heavy cardstock from your stash. I usedsome of both. I made a total of 8 cards for this project. I may add a few more later. It's totally up to you. I think these are great for adding special photos inside along with the paper dolls.
Large file folders measure: 8 & 7/8 x 6 & 1/2 inches, score at 4 & 1/8 inches.
Medium File folders: 7 & 3/8 x 5 & 1/2 inches, scored at 3 3/8.
Pocket cards are 3x4 inches
I'll be using a variety of scrap leftover papers from this collection along with some Journaling cards in this kit.
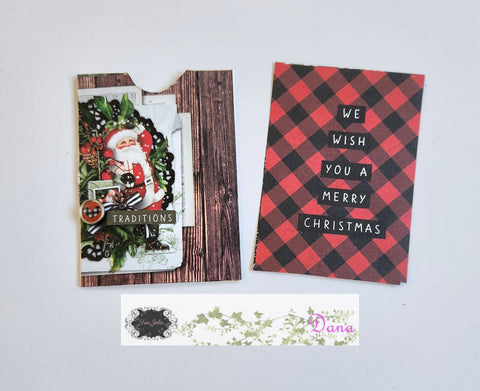
File card 1: I decorated the front side with a piece of patterned paper. Added a Tim Holtz idea-ology paper doll (in my stash) using foam dots and one of the matching Brads from my stash and this collection.
The inside I made a small pocket and tucked acouple ephemera pieces inside. I adhered a sentiment sticker over the tab and adhered a border strip at the bottom. Here's some photos:


File card 2: I decorated the front of my file using the Bits and pieces ephemera in your kit. I adhered the pinecone and Santa using foam dots from my stash. I added a sentiment tab at the top. Inside I cut down and adhered one of the sentiment journal cards on the bottom and added another paper doll. I scored in the center so she sits on top of the sentiment square. From my stash I attached a tiny clip on the right to hold my file together, from my Tim Holtz idea-ology stash.

 File card 3: I cut down one of the 4x6 Journaling cards. I cut the doily in half, inked the edges using Distress Ink and glued my doily on the left side. Then adhered the Santa card onto my file folder. I added a pretty red flower from the kit and one of the matching Brads on the bottom left corner.
Inside top, I created a pocket. Glued a photo onto one of the ephemera tags, and added a brad over the top hole on my tag. Tucked another ephemera piece inside my pocket.On the bottom if my file folder, Using an xaco knife in my stash, i cut along the Santa image to create a side pocket. Then glued my 4x6 Journaling card along the bottom. Tucked another set of paper dolls inside my pocket. Adhered another sentiment tab at the top.


File card 4: Cut a piece of patterned paper and glued on the front. Popped a ephemera sentiment on the left side with foam dots and added a tiny white flower from the kit. Added 3 enamel dots on the upper left corner and some washi tape on the right.
Inside I made a small pocket on the bottom and tucked a tag and paper dolls inside my pocket. Top portion more washi tape and sentiment sticker on the tab. I cut one of the Journaling cards and added a photo on the front. You could add another photo on the backside if you like.


Pocket cards for both 5 and 6. I cut one of the longer journal note cards, scored in half, stabled an ephemera piece at the top. Slide into your pocket. The Santa pocket I just cut out a 3x4 Journaling card and slid inside my pocket. I adhered a small brad and sentiment on the pocket front.
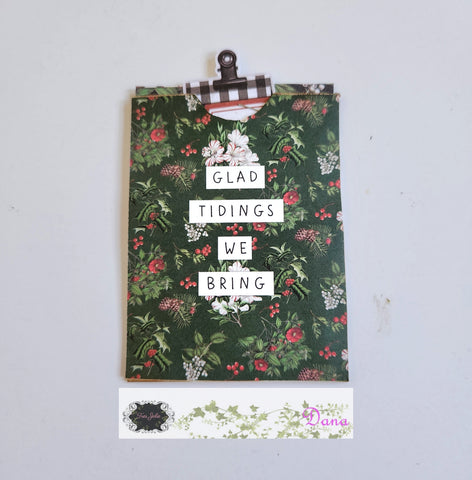

Large file 1: I adhered some checked washi tape along the sides and bottom. Then I covered the front with a vintage patterned paper. Added acouple ephemera pieces on the front using foam dots. Adhered a brad at the bottom and a sticker sentiment at the top right corner. On the house roof I applied some Stickles Diamond glitter (in my stash)to the roof.
Inside bottom I adhered a smaller Journaling card and using foam dots adhered another paper doll. Washi tape along the bottom edge.
The top portion I made a checkered pocket, tucked acouple ephemera pieces inside the pocket. Added a chipboard sentiment and paper dolls on the front of my pocket. I stapled the sticker sentiment ticket at the top and another sentiment sticker on the tab.


Last large file: adhered another 4x6 Journaling card on the front. I made a film slide from a die (in my stash )and glued the cardinal image inside. Added a sticker sentiment at the bottom. Inside on the bottom I created another pocket and tucked more ephemera pieces inside the pocket. I created another pocket on the top portion. Added a strip of washi tape along the top edge and tucked inside a paper doll, tree ephemera and small journal card. Sentiment sticker over the tab.


Well we are finished with our vintage box! I hope you've enjoyed my project and will make one to display in your home. It's a great way to add precious family photos and enjoy during Christmas time! You could definitely add more cards if you desire.
Until next time, Happy Crafting!
Dana

Thanks for taking the time to stop at the Tres Jolie blog! Please share your crafty makes and grab your kit today! Be sure to check back to see what more project inspiration from Jeanne and Crystal! You can find Tres Jolie here: