Shabby Chic Valentine Tags
Hello Craft Friends! Dana here with my first project for February. It's the month of Love! Our February Cards Tags and More kit from Tres Jolie has the prettiest papers from Paper Boutique "Endless Love" collection. It includes some lovely card Diecut Toppers, sentiments, Chipboard hearts and cute Resin frames. Isn't it beautiful?

So for my project today, we'll be creating some Shabby Chic tags, certain to put a smile on your face and surprise someone special with alittle happy mail. I love to tuck a tag inside my handmade cards.
I'll be using some extra crafty supplies from my stash! My chipboard tags measure 3 & 1/2 x 6 & 1/4 inches. If you don't have any pre-made tags on hand, you can cut your own out of heavy cardboard. Then I punched a hole at the top of each tag.

I will be inking all of my papers using Distress Ink "Worn Lipstick " included in this kit, along with Tim Holtz Distress Ink Gathered Twigs.
Tag 1: chose one of the papers in your paper pack, cut to cover your tag base. Don't forget to punch a hole at the top of your paper before adhering to your tag base. I also punched out one of the pretty card toppers and sentiment.

I added foam tape (in my stash) to the back of my sentiment topper before adhering in the center of my tag base. I glued a piece of lace (from my stash)along the left side of my tag. Then I took some small Resin roses (in my stash) brushed alittle Distress Ink Worn Lipstick over the top.

Then I glued one at the top and bottom of my sentiment topper. I took one of the chipboard heart pieces and glued it underneath my sentiment topper. I diecut some leaves (a die from my stash) and tucked behind my sentiment along with a beaded sprig. The "Just for you" sentiment I glued along the bottom. Added a few crystals (stash) scattered on my sentiment topper. To finish my tag I cut a piece of pink tulle (my stash) thread throughthe hole in my tag and tied into a bow! Here's some closeups!


Tag 2: I took another sentiment topper (i love you) and fussy cut along the edge. Ink edges. I covered my tag base with the tiny hearts paper. Using foam dots I adhered another patterned paper measuring 3 x5 inches.

I glued some lace along both sides of my tag and along the bottom edge. Then glued a string of pearls on top of my lace trim. (Both items from my stash)
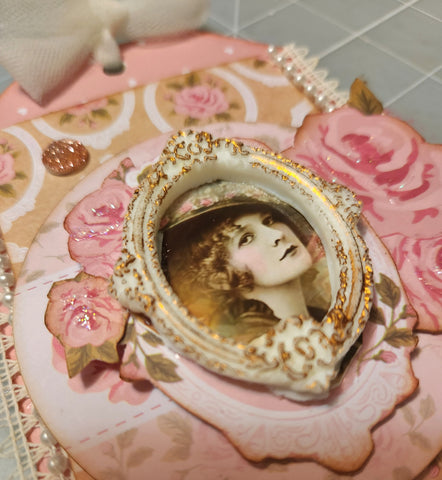
Next I took the Oval Resin frame from the kit, and using my finger I applied a tiny amount of Gliding Wax Empire Gold on the raised areas. Here's how it looks:

I cut out a vintage lady photo from my craft stash, and adhered to the back of my Resin frame. Then glued my frame onto my fussy cut piece. Here's a closeup!

I adhered foam tape onto the backside of my frame, then adhered my framed piece onto one of the circle toppers in the kit. Then glue your topper in the center of your tag. I fussycut some roses from the scrap paper and one of the toppers. I inked and glued along the sides of my piece. Here's a closeup!

To finish my tag, I cut out a tiny sentiment from our paper pad, I curled both ends slightly before adhering at the bottom of my tag. Added a few crystals and tied a piece of cream tulle through the hole at the top of my tag! Here's some photos for you!


Tag 3: I repeated the previous steps covering my tag base with patterned paper. This time I chose another circle topper, and glued a lace doily (my stash) in the center of my tag base. Then adhered the circle topper on top using foam dots. I cut out a tiny sentiment from the paper pad and glued on the upper right corner. I added acouple diecut sprigs, flower from the kit and took acouple small roses (in my stash) applied the Distress Ink Worn Lipstick (from our kit) over top and tucked those behind my larger flower on the right side. To finish my tag, I tied some pink tulle into a bow at the top. Added a few pink pearls (my stash) scattered on my sentiment circle. Here's some closeups!


I like to add alittle sparkle to my rose images and pieces using some Stickles Diamond glitter (from my stash)
I hope you've enjoyed my project and will order your kit today so you can start creating some Valentine's Day tags to send to someone special! Thanks for stopping by the Tres Jolie blog! Be sure to check back soon and see more beautiful projects from Kim, Jeanne and Crystal!
Until next week, Happy Crafting!
Dana
