Today I will be sharing some shabby chic cards I created using the newMarch 2024 Card Tag and More Kit from Tres Jolie. I also have a video tutorial for you to follow if you would like more details on how I put together each individual card.
For our first card you will cut a cardstock mat at 5 1/4 x 4 and the pattern paper mat at 5 x 3 3/4. For my mats I used a rose gold foil cut 5 1/4 x 4 inches and my pattern paper measures 5 x 3 3/4 inches. I folded down the right corner of the pattern paper and glued down and adhered the pretty pink heart on top with a flower in the middle. These flowers along with the pretty hearts with flower petals are found in your kit.
Next I adhered down the flowers using my hot glue gun.
I took the wooden letters and ran them across the spun sugar ink pad and
then adhered them down with glue.
I did fussy cut out a butterfly from the Stamperia paper collection Romance Forever and adhered it in the right hand corner. I just love how this card came out. So dainty and shabby.
Card #2
For this card we will create an easel card. You will use two of the card bases from theCard Kit.
Cut one card in half this will give you two mats but we only use one. For the next card fold one side in half as I am showing below.
Next take a 9x3 piece of card stock. and score at 3 and 6 inches.
Next turn the paper diagonal with your ruler from the one corner to the end of the score line corner draw a line and cut. Do this on both ends of the card stock.
Now your strip of paper should look like the strip below.
***TIP ***
To cover the top of your pocket take the triangle pieces we cut off from the strip above and place them on your pattern paper and trace. Cut them out and adhere the pattern triangles on the pocket
Next cut mats for the white card base. The light pink card stock I'm using is cut at 5 1/4 x 4 inches and my pattern paper measures 5 x 3 3/4 inches. Once you are done cover the inside and outside of your pocket fold over the flaps and glue just the ends together so you can have a little pocket to place a tag or gift card inside, I did mat behind the pocket using the light pink card stock. Now adhere the pocket to the center of the card front.
Now add glue or adhesive to the folded flap and adhere your card front down.
Now you can adhere your papers to the inside. On the bottom of the card find a sentiment and pop up with foam tape, this help secure the easel portion of the card to stand up.
Now we are done.
Card #3
For this card you will use a card from theCard Kitand cut the front flap off at 2 inches. So you will have a little flap left.
Next I used the doily stamp from the card kit with versa mark and heat embossed a couple panels for this inside of the card.
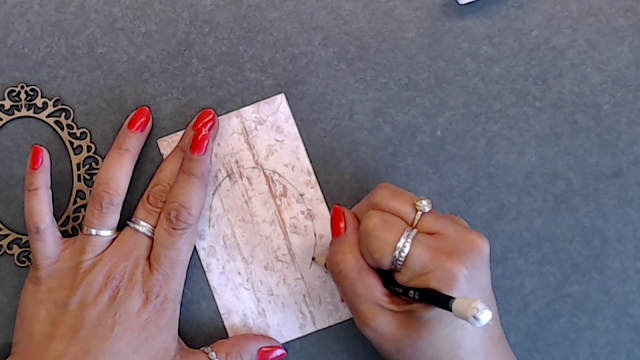
Next I took the chipboard frame from the kit, laid it down on my pattern paper and made tiny dots from the inner openings around the chipboard piece. Once I was done I connected the dots and cut out the oval and adhered to the back of the chipboard frame.
Only on one side of the chipboard piece add glue as shown below.
Adhere the chipboard frame to the center of the front flap.
I added one of the pretty pink hearts to the center of the frame with one of the sentiments from the collection and I fussy cut the dove adhered it to the frame. I also added some flat back pearls around the card. This card turned out so beautiful. It's one of my favorites.
Thanks for joining me today. I hope this gives you some inspiration for this monthsCard Making Kit.
I hope you get a chance to create some card, tags or your favorite project using this months Card Making Kit, it's just beautiful. I have all the links down below for you as well throughout the blog just click on the name of the product and you will be directed to the store.
.png)