Mini Folio Album - December 2022 Cards, Tags, & More Kit
Hey, y’all! Hope you’re having a fabulous December!
Have you had the chance to check out this month’s kits? They are all sure to get you into the holiday spirit in no time! For my first project of the month, I used the Cards, Tags, & More Kit to create a mini-folio-album-thingy. Maybe I should call it a wallet album since the size, shape, and the way it opens reminds me of a wallet…anywho…I used a couple of the solid cardstock sheets, and about 5 or so of the patterned paper sheets to create this fun little album – then I printed out some photos from Christmas a few (or maybe more than a few!) years ago to fill it up.

To get the run-down of how this all went together, I have a video where I explain my process and try to explain my thinking! (LOL – explain my thinking!)
 |
 |
Although the closure was the last thing I did for the project, I’m just going to go over its construction now with the photos of the folio album all closed up.
I used the full length of ribbon from the kit to create my closure by cutting the lengths needed for both the horizontal and vertical wrap and a faux bow. I wanted everything to remain smooth and flat – which is why I wrapped each direction separately – then used Fabri-Tac to hold it in place (pardon my areas of excess glue that soaked through – I had forgot I had just got through thinning my bottle out when I went to use it and it got away from me!). My bow is a faux bow because I just folded the bit of ribbon into a bow shape, added staples to hold it together in the center, then wrapped the last little piece I had as the “knot” for the center.
For the closure, I used some white velcro. I have a couple inches of the hook side of the velcro (the stiffer side of velcro that grabs) on one end of the horizontal ribbon, then I added pieces of the other (softer/fuzzy) side of the velcro to the other end of the horizontal piece and the back of the bow after attaching my bow to the vertical ribbon.
For the outside patterned paper, I just picked out what I wanted to use, and cut it down to size.

I used the full sheet of this piece of cardstock from the kit and just added some score lines to create a size to work with! I have 1” scores along the long sides, then, from left to right, I scored at 1-1/2”, 2-1/2”, 6-3/4”, and 7-3/4”.

Then, because this cardstock isn’t necessarily “made” for a lot of sharp folds or hinging, I added score lines between the 1-1/2”, 2-1/2”, 6-3/4”, and 7-3/4” scores at 1/8” intervals. The only excess pieces I cut off were where the score lines intersected with the 1” side margins (the little flaps that are folded up in the image above).
I left the flaps for the top and bottom of the folio so I could fold them in to reinforce and round those edges some, and the flaps in the “main” (center) section are where my inside flaps connect.
 |
 |
As I have been known to do, I used some packing tape to strengthen my moving parts! I added to all of folds in my base so that cardstock would have some support at all the bends. (I only added tape to one side of the cardstock, I didn’t want to make the folds too stiff!).
To help hold everything in place, before I glued my outside patterned paper in place, I added a few small staples to the corners with the top (flat) side of the staple showing on the inside but allowing the bottom (curved) side to be covered when I added the outer papers.

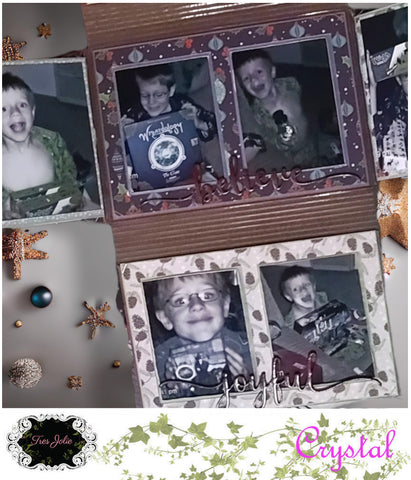
For these little windows/frames, I marked where I wanted to cut on the back of the patterned paper I would be using and carefully cut the centers out using my craft knife. I kept the frame edges at 3/8”, allowing just enough room for a 2-1/2”x3” photo to slide in and not have too much of the photos edge covered. For the green cardstock backing the patterned paper, I just used my cut patterned paper as a template and added (about) a 1/16” extra to peek out from the inside and outside edges. (Note: The windows/frames in the center section were created the same way! And since I hadn’t glued anything down yet, all I had to do was use my already-cut pieces as templates!)

For my inside flaps, I cut the cardstock into 3-3/4”x 4-1/8” pieces, then scored at 3/8” to create a 3-3/4”x3-3/4” square and glued then reinforced with more tape the 3/8” edge to my 1” flap on the base. I have my 3/8” flaps facing each other - creating a 3/4” space between them – then I just cut a strip of patterned paper down to size to cover that seam!
 |
 |
After the main body of the album was put together, I just went through and used up all the smaller bits of patterned paper and cardstock I had from the build to decorate the remainder of my album.

For my chipboard pieces, I gave them a coating of “Lumberjack Plaid” Distress Paint, then used the “Lumberjack Plaid” Distress Ink and Embossing Glaze for some depth and shine. After the Distress Glaze had cooled, I came back with some Lindy’s Embossing Powder and added it to the bottom half-ish of the chipboard to create a gradient type effect (I just used the “Lumberjack Plaid” Distress Ink again for the Lindy’s since I already had it out!). Then the only thing left to do was glue my words down, add my ribbon, and tuck in my photos.

I do hope I wasn’t too confusing in this blog post! If I was, the video should be far clearer!
Thank-you for joining us here today at Tres Jolie! I hope you enjoyed this project and it gave you some ideas of what you can do with this month’s Cards, Tags, & More Kit!
Stay Crafty, Friends!
...
Did you get a kit? Share what you made in our Facebook Group!
Thank you for joining us here at Tres Jolie Kits!
...
Tres Jolie can also be found at:
...
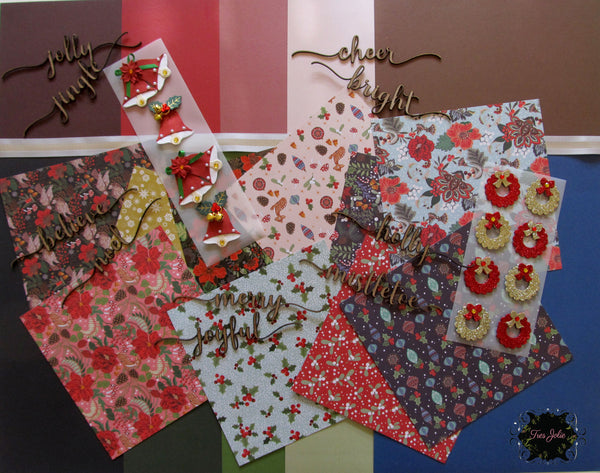
In addition to this month’s Cards, Tags, & More Kit, I used:
Distress Ink “Lumberjack Plaid” , Distress Paint “Lumberjack Plaid” , Distress Embossing Glaze “Lumberjack Plaid” , Lindy’s Gang “Silver Moon Mistletoe” Embossing Powder , Ranger Blending Tool , We R Memory Keepers 3-Way Corner Punch & Craft Knife , white velcro , Fabri-Tac , Art Glitter Glue , Aleene’s Tacky Glue , Gorilla Packing Tape , Tim Holtz Tiny Attacher