Halloween is comin up soon and I have a fun Haunted House Chipboard Album to share with using the Haunted House Chipboard Album from Tres Jolie along with the Scrapbooking Kit and Mixed Media Kit.
Here is a tutorial for you so you can follow along.
I used the Chipboard Haunted House, Scrapbooking Kit papers along with the flowers & little buttons. I know this paper doesn't look like Halloween paper but I have to say this paper was absolutely perfect for this Haunted House Chipboard and coordinated so well with the rice paper from the mixed media kit.
To begin the album I cover the front of each of the blank houses first and punch the holes before you cover the back otherwise it might be hard to find where to punch the holes later. When covering the houses I just used my regular craft glue.
Once you apply the glue adhere to your pattern paper. Be sure to burnish down really well before cutting.
Next cut the excess paper off around the house. I traded of between using my scissor and xacto knife. Do this for all the houses front and back. Remember to punch holes prior to adhering paper to the back of the house.
Next I created to pockets cut 2 pieces of pattern paper at 5 x 3 1/2 inches. Score 1/2 inch on the right and left of the 5 inch side, turn to the 3 1/2 inch side and score 1/2 inch down.
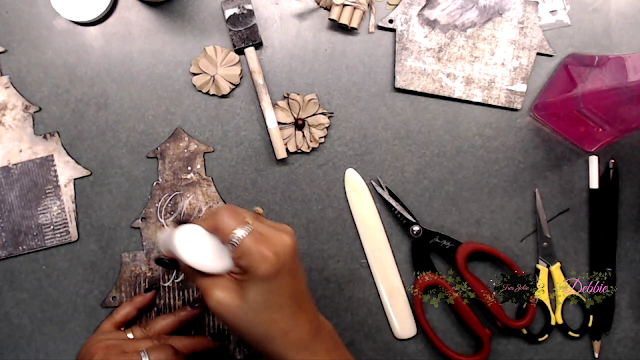
After you score the pockets you will have 2 score lines the intersect like an "X" see my down below where my scissors are placed, you will cut diagonally across the bottom on both ends. Do this for both pockets.
Next add glue to each of the 1/2 inch flaps
Fold the 1/2 inch flaps inward and place down on the house. Placed the bottom edge of the pocket down on the bottom edge of the house.
The next pocket we make is a slanted pocket. Cut a piece of cardstock at 4x4 inches.
Next score the 4x4 cardstock 1/2 inch on 2 sides. Score on the left side, turn and score 1/2 inch on that side. Cut again on the where the 2 score lines intersect, cutting it diagonally.
Next place your ruler at edge of the score line and measure 1 inch inward and place a tick mark, and do the same thing at the bottom place the ruler upward and measure an inch and make another tick mark,
Have the ruler placed on each mark which will make a slant and draw a line.
Next cut a piece of pattern paper at 3 3/4 x 3 3/4 inches this will be your cover to mat on top of the pocket. Place the pattern paper on top of your pocket flip over and trace the slanted line and edges.
Cut out and adhere to the pocket.
Next place some glue to the 1/2 inch flaps and adhere to the back of the cover. I created 2 4x4 inch photo mats to fit inside the pocket. You can place more if you'd like.
Oh this is the fun part! For the cover of the haunted house, I used the distress crayons which came in the mixed media kit. These are so fun to use. I just colored them on the house and just used a lightly damp paint brush or my finger to smooth out the crayons.
After the house is dry from the Mica Spray I traced one of the houses on a pattern paper cut it out and adhered it the back of the haunted house cover.
Next we use the rice paper to add to the Haunted House. I am so excited for this part. I cut out the images from the rice paper.
Spray with a bit of water be careful not to over saturate as it will get soggy.
Once you have a bit of water sprayed on the edges of the rice paper you can pull the edges gently. Do not pull to hard as the rice paper can tear, add a bit more water as needed.
Once you are done with your rice paper image place your glue down and adhere your image to the house.
Here is the ghost lady. I did add a bit of black ink around the edges. I also added a bit of modge podge to the edges and a bit on top of the rice paper image. Only one coat .
Next I decorated the pockets with the 49 and Market flowers from the Scrapbooking Kit and used the cogs that I sprayed with the Distressed Mica Stains. I liked adding the flowers I think it added a bit of softness to the album.
I added 4 photo mats. These photo mats measure 3x4 inches. I did mat these photo mats on top of pattern paper that were scrap pieces from the pattern papers we cut. Once I matted them I adhered each one down horizontally to a house.
I added the little buttons in each of the photo mat corners. These little buttons are self adhesive and are in the Scrapbooking Kit.
Last we create little trifold booklets for the pockets. Cut 2 pieces at 3 1/2 x11, score at 3 1/2 and 7 1/4 inches and fold. You can use scraps to cover these or if you have the Scrapbooking Kit use Clang & Dirt paper.
Here are some photos of how the pages looked after they are done and decorated. I really liked how the Clang & Dirt paper from the Scrapbook Kit looked on this Haunted House along with using the items from the Mixed Media Kit, it coordinated so well together. I had so much creating this Haunted House Chipboard Album. I have the links here so all you have to do is click on the words and it will take you to the store. I also links down below.
Thank you so much for joining me today. I have the links below for you. Head over to the Tres Jolie Shop to check out this Haunted House Chipboard Album.
All the designers will be revealing their projects on the Tres Jolie blog all month long. Make sure you join us for tons of inspiration, including video and photo tutorials. Also make sure you check out our newest chipboard designs that were just added to the store.


.png)
.png)
