Cards, Cards, Cards! - July 2022 Cards, Tags, & More Kit
Hey, y’all! We've made it to the end of July and are that much closer to the end of this oppressive summer heat! (I hope!!)
For this month's final project, I used up the bits and pieces of the Graphic 45 “Cottage Life” papers I had, along with some cardstock, dies, and mediums from my stash, to create some cards & envelopes.

To get all the details of what I did for these cards, check out my video!
...
Video:
...
All of the cards are rather straightforward. I used my last two uncut sheets of the “Cottage Life” paper to make two envelopes for 3-1/2”x6” cards – the largest size envelope that can be made using an 8”x8” sheet on the We R Memory Keepers Envelope Punch Board – and used two pre-made envelopes and card blanks for the other two cards.
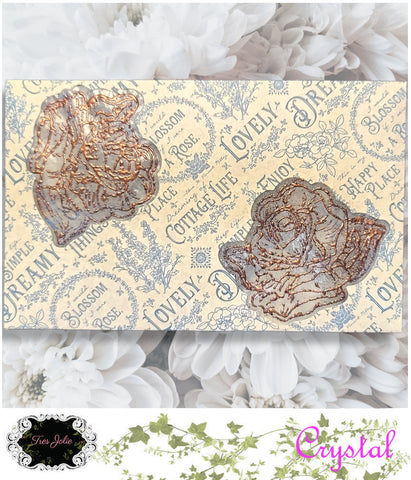
This first card is made with some metallic cardstock from DCWV and decorated using the TCW stencil from June’s Mixed Media Kit, texture paste from my stash, and embossing powder. I sprinkled the embossing powder on the texture paste while it was still wet and waited until it dried before heating it up. Although you can heat dry texture paste on its own, because you can keep the heat farther away and in constant motion, it doesn’t work as well when the paste is topped with embossing powder! The heat needed for embossing powder – or rather the heating method – can, and generally will cause the wet texture paste to form bubbles.
 |
 |
After my embossing powder was heated and cooled, I sprinkled on some of the Lindy’s “Bavarian Blue” Magical Powder that is in this month’s Mixed Media Kit, gave it a spray of water, and let it spread out between the stenciling! I had the framed phrase that I made when I was working on the “Cottage Life” décor piece (the project posted on the 21st), so I added it to my card front and stamped a simple sentiment on a strip of cardstock to finish out my card front.
For the envelope I used a Vicki Boutin stamp and die set from my stash to create the little windows. Before I folded the envelope up, I used the rose die to make the windows in the envelope and glued in some faux glassine that I had stamped and embossed with the coordinating rose stamp.

I didn’t do anything to the envelope for this card except fold it! Honestly, I just couldn’t think of anything I wanted to have premade and decided to wait until the time came to use it!
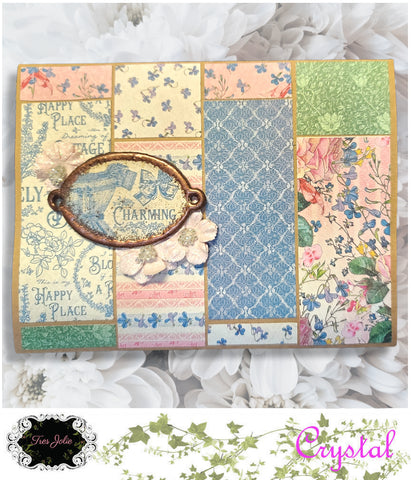
For the card, all I did was cut a couple of the wider strips of the patterned paper to the length I needed and a strip of cardstock to the length and width I needed for the top section with the sentiment. Before I added the cardstock with the sentiment, I added some “Mowed Lawn” Distress Oxide Spray to the patterned paper. I didn’t intend to add so much, sometimes my hands have a mind of their own! Anyhow, I just wet it and mopped it up a bit. It was already there, so I just worked with what I had!
After I stamped my sentiment, I decided I wanted to have it stand out more, so I traced it all with a metallic pen, then I added my mini pearls, and this card was done.
The next two cards were made using some card and envelope blanks by Recollections from my stash.
 |
 |
For this card, I grabbed my 1.5” hexagon punch, a set of hexagon dies, and my bird silhouette dies. I didn’t want to cover the whole front of the card with hexagons, so I just randomly placed them in a way that I thought looked good and added my birds. To make the birds stand out, I hand drew a line for them to stand one, outlined them in coordinating metallic pens, and then used a dark grey pen for their shadows – just smearing out it with my finger. I stamped the sentiment on a little piece of my homemade glassine and added it to the card front. Super quick and easy card!
For the envelope I place my hexagon dies inside the envelope so I could cut out some windows, added my birds, and then backed then with some my homemade glassine.
 |
 |
For the fourth and final card, I just filled up the card front with blocks of the patterned paper and added a few flowers tucked under the chipboard piece. Very quick and easy card front – especially with the use of a pre-made card base!
The envelope wasn’t as quick and easy! When I had first started playing with the faux glassine technique that I learned from Nik the Booksmith, I had used this cute little stamp from my stash to stamp on a piece of tracing paper, then used some colored pencils to fill it in before spraying it with the glossy spray and turning it into a [faux] glassine print! Since I had already cut it in half (I had been thinking of doing something else with it originally) I decided that I needed to create a windowpane for my envelope.
For the cute little scene “outside” the window, I wrapped some blue-ish faux glassine (created previously using the wax method) around the white side of a piece of the cover from the Graphic 45 stack and placed it behind my showering squirls! I also have some foliage bits along the bottom that I was able to cut from some of the green print. Not a lot, because my die was bigger than the piece of paper I had to work with, but there is some there!
After I cut out four rectangles from my envelope to create the window opening and gluing in my squirls, I added in strips of the patterned paper to help bring it to life … and also possibly because my craft knife got away from me and I accidentally cut across one of the cross pieces, so I had to find a way to put my window back together! Well, that led me to then having to make sure my edges were all evenly sized, so I added the blue strips of patterned paper and finally made four, 3/8” wide strips of the paper used around the outer edge.
 |
 |
 |
 |
Thank you for joining us here at Tres Jolie! I hope these cards inspired you and gave you some ideas of what you can do using the Graphic 45 paper and chipboard found in this month’s Cards, Tags, & More Kit. Make sure you are following us so you can see all of the kits and projects from Tres Jolie and the Design Team!
Stay Crafty, Friends
...
Did you get a kit? Share what you made in our Facebook Group!
Thank you for joining us here at Tres Jolie Kits!
...
Tres Jolie can also be found at:
...

In addition to the items from this month’s Cards, Tags, & More Kit and a little from this month’s Mixed Media Kit (*from previous Tres Jolie Kits), I used:
TCW *Slimline Stencil “Circular Rings” , BoBunny *“Sentiments With Love” Stamp Set , *Gary M Burlin Co. “Patina Bronzed Copper” Embossing Powder , Prima *“Watercolor Floral” Flowers , *Eyelet Outlet Jewels Multi Pearls “Green” , Ranger *Letter It “Party” Clear Stamps , Stampendous “Squirrel Shower” Cling Stamp , Vicki Boutin “All The Good Things” Stamp & Die Set 2 , Distress Oxide “Prize Ribbon” , Distress Oxide “Mowed Lawn” , Distress Oxide Spray “Mowed Lawn” , Ranger Texture Paste “Opaque Matte” , Simon Says Stamp “Barely Beige” , StazOn “Green Olive” , Recollections Value Pack Cards & Envelopes “Kraft” & “Ivory” , Tim Holtz “Silhouette Birds” Thinlits , Tim Holtz “Flower Field” Thinlints , Tim Holtz Stamp Platform , EK Tools Score Board , We R Memory Keepers Envelope Punch Board & Craft Knife , Sizzix Big Shot Plus , Fiskars 1.5” Hexagon Squeeze Punch , DCWV “Linen” Cardstock Stack , Sakura Gelly Roll Metallic , Glaze , & Souffle , Faber-Castell “Black” PITT Artist Pens , Aleene’s Tacky Glue , JudiKins Diamond Glaze , Art Glitter Glue , Mod Podge Gloss Clear Acrylic Sealer , double-sided adhesive foam squares , 1/4” double-sided tape
