Beautiful Gift Bags using the Card, Tag & More Kit
by Deborah Adams
Hi everyone
I am excited to share my Gift Bags with you today using theNovember Card, Tag & More Kitfrom Tres Jolie. This months kit is just awesome because you can decorate these bags for any special occasion you have coming up or place them in your stash until you are ready to use them. I have a video tutorial to share I created each gift bag.
Here are the supplies you will need from theCard Kit. So let's get started.
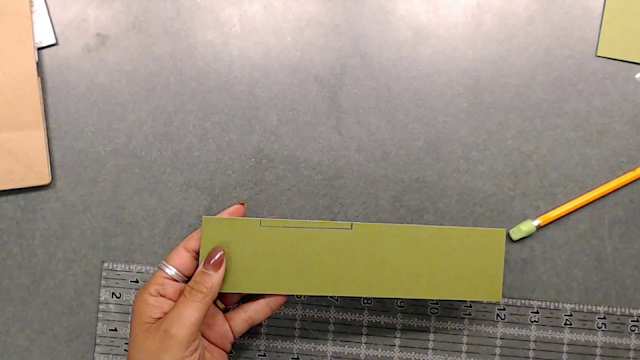
BAG 1
Cut two pieces of the green cardstock one for the front and one for back. Measuring 5 x 7 3/4 inches. Do not adhere yet.
Score both pieces of cardstock at 1 1/2 inches.
Next adhere both pieces of green cardstock down to the paper bag and adhere down your pattern paper on top.
Next I chose a piece of the pattern paper from the kit with an image on it and used the49 and Market Rub ons from the kit.I rubbed on the word "Enjoy" on top of the image.
Here is what the image looked like after I finished rubbing it on. The rub ons are so simple to use and I like the variety of fonts they come in, they really add a nice touch to the the project.
Next I inked up one of thechipboard pieces from the kit,these are so pretty. I used the Distress Ink ground expresso that comes in the kit to ink up the chipboard piece.
Next place glue on top of the chipboard.
And add glitter to the chipboard piece. You can use any glitter you have in your stash. I used Distress Glitter Brushed Corduroy.
Next I adhered down the chipboard to the left hand side of the bag and I placed down my flowers from 49 and Market. These flowers come in your kit and are so cute & dainty
Next I tied on my tag to the handle of the bag I did use some rub ons on the tag and stamped "just for you" with a stamp from my stash. I also adhered some flowers in the upper left corner and in the bottom right corner.
BAG 2
For Bag 2 - cut a strip green cardstock at 4 inches. And score at 2 inches
Next line your ruler up to the folder part of the strip and come down about 1/4 inch from the edge.
Make a tick mark at 1 1/2 inches and at 4 inches. Then draw a line connecting both tick marks.
This what your folded bag topper should look like.
Next grab your trimmer or scissors and cut where the tick marks are and where the connecting line is.
This how your bag topper should look now. with a little notch on the folded end.
Next to cut the excess off place your topper over the handles and mark where the bag ends and cut the excess off.
Now your bag topper is finished.
Next you can decorate the bag any way you would like.
For my bag I fussy cut out one of the flower images and this oval image as I really liked it.
I added some rub ons to the white inside of the oval and the rub on words "You are a Delight".
I also covered the bag topper with pattern paper. For more details you can view the video tutorial listed above.
BAG 3
Bagg 3 is really simple bag and takes no time at all. Cut three banners, the pattern paper measures 2 1/4 x 6 1/2 inches; green cardstock at 2 x 5 1/2 inches; kraft paper from my stash 2 1/4 x 4 inches. Cut notches at the end of each one.
For the pattern paper and green cardstock banner I adhered down. For the Kraft banner I added some rub ons around this one and the word "Enjoy". Once I was finished I adhered it on top of the green banner.
I did create a little tag for this bag. I covered the entire tag and punches two holes side by side and used three piece s of twine to tie a bow. I tied the tag onto the bag handle. For more details you can view the video tutorial on how I created this bag & tag.
Thank you so much for joining me today. I hope you received from inspiration from todays project share. I have link below for this fun Card, Tag & More Kit for you.
Happy Crafting
Debbie
November Card, Tag & More Kit - https://tresjoliekits.com/collections/card-kit/products/cards-tags-and-more-kits-2023?variant=42741347287226
Don’t forget to follow us on all our social media:
All the designers will be revealing their projects on the Tres Jolie blog all month long. Make sure you join us for tons of inspiration, including video and photo tutorials. Also make sure you check out our newest chipboard designs that were just added to the store.